
Deploy Gateway Terdistribusi
Single Deployment Gateway
Pada asalnya sebuah instance gateway mampu melayani 2 buah jenis token , yaitu Sandbox dan Production. yang dikena dengan model hybrid. Ketika ada request yang masuk ke gateway, maka gateway memeriksa token yang digunakan. Apakah token tersebut merupakan token production ataukah sandbox. Lalu, request akan diteruskan ke endpoint yang sesuai dengan jenis tokennya. Berikut adalah scenario default untuk single gateway model hybrid :
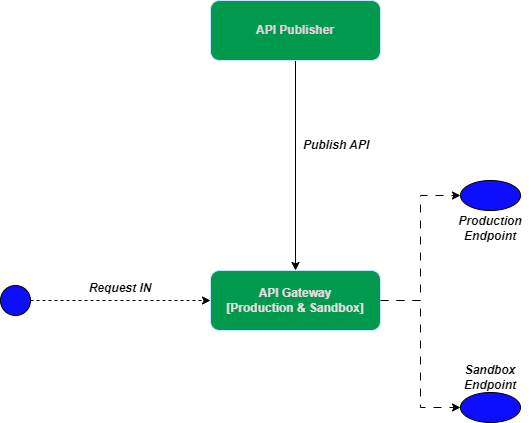
Single Gateway Hybrid
Distributed Deployment Gateway
Single gateway memiliki kelebihan dari sisi kemudahan deployment, namun pada satu kondisi model arsitektur satu gateway yang mampu menangani lebih dari satu jenis token ini akan menurunkan performansi. Perlu dilakukan pembagian beban ke sejumlah gateway yang masing - masing berdiri sendiri atau yang dikenal dengan istilah distributed gateway. Satu gateway menangani jenis request yang berbeda - beda, misalnya satu gateway yang khusus untuk Production dan lainnya untuk Sandbox. Berikut ini ilustrasinya :
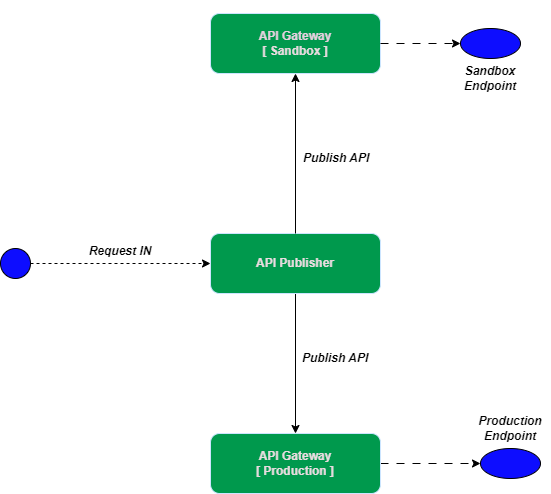
Distributed Gateway
Case Study
Solution
Perlu disiapkan instance sebagai berikut :
Berikut ini adalah arsitektur jaringan yang akan kita bangun dan kita akan bangun dalam satu mesin (localhost) dengan port yang berbeda
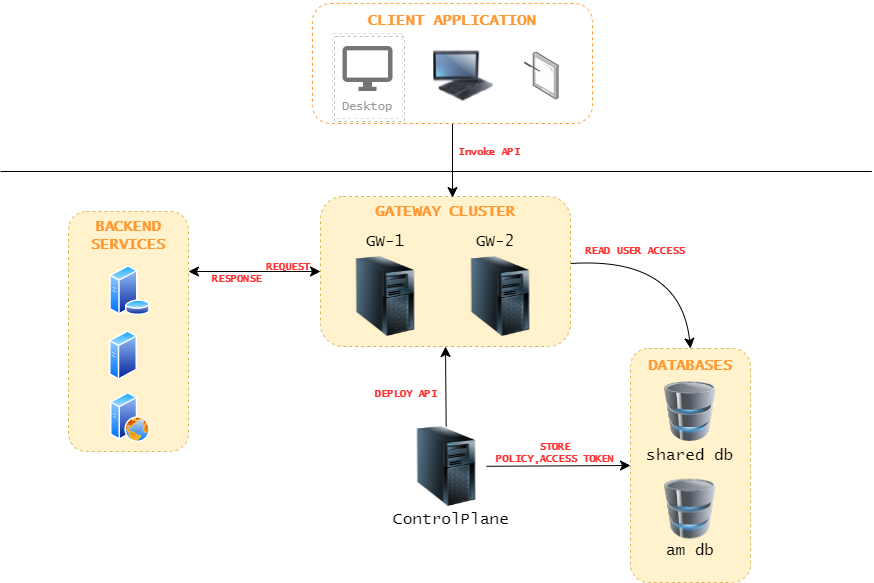
1. Konfigurasi Instance Control Plane
Control Plane adalah komponen APIM yang didalamnya terdiri atas :
Berikut ini langkah - langkah konfiguras CP :
<PRODUCT_HOME>/bin/profileSetup.bat -Dprofile=control-planemaka akan terlihat sejumlah artifact / war file akan dibuang sehingga lebih efisien ketika running
Buka file deployment.toml (<PRODUCT_HOME>/repository/conf), lalu sesuaikan seperti pada table berikut. Informasi yang tidak ada pada table ini silahkan dihapus dari deployment.toml.[server]
hostname = "localhost"
offset=0
base_path = "${carbon.protocol}://${carbon.host}:${carbon.management.port}"
server_role = "control-plane"
[super_admin]
username = "admin"
password = "admin"
create_admin_account = true
[user_store]
type = "database_unique_id"
[database.apim_db]
type = "postgre"
url = "jdbc:postgresql://localhost:5432/am_dbcp"
username = "wso2carbon"
password = "wso2carbon"
driver = "org.postgresql.Driver"
[database.shared_db]
type = "postgre"
url = "jdbc:postgresql://localhost:5432/shared_dbgw"
username = "wso2carbon"
password = "wso2carbon"
driver = "org.postgresql.Driver"
[keystore.tls]
file_name = "wso2carbon.jks"
type = "JKS"
password = "wso2carbon"
alias = "wso2carbon"
key_password = "wso2carbon"
[[apim.gateway.environment]] # ==> Konfigurasi Gateway 1
name = "GW-1"
type = "hybrid"
display_in_api_console = true
description = "This is a hybrid gateway 1 that handles both production and sandbox token traffic."
show_as_token_endpoint_url = true
service_url = "https://localhost:9444/services/"
username= "${admin.username}"
password= "${admin.password}"
http_endpoint = "http://localhost:8281"
https_endpoint = "https://localhost:8244"
[[apim.gateway.environment]] # ==> Konfigurasi Gateway 2
name = "GW-2"
type = "hybrid"
display_in_api_console = true
description = "This is a hybrid gateway 2 that handles both production and sandbox token traffic."
show_as_token_endpoint_url = true
service_url = "https://localhost:9445/services/"
username= "${admin.username}"
password= "${admin.password}"
http_endpoint = "http://localhost:8282"
https_endpoint = "https://localhost:8245"
[apim.cors]
allow_origins = "*"
allow_methods = ["GET","PUT","POST","DELETE","PATCH","OPTIONS"]
allow_headers = ["authorization","Access-Control-Allow-Origin","Content-Type","SOAPAction","apikey","Internal-Key"]
allow_credentials = false
[[event_handler]]
name="userPostSelfRegistration"
subscriptions=["POST_ADD_USER"]
[service_provider]
sp_name_regex = "^[\\sa-zA-Z0-9._-]*$"
[database.local]
url = "jdbc:h2:./repository/database/WSO2CARBON_DB;DB_CLOSE_ON_EXIT=FALSE"
[[event_listener]]
id = "token_revocation"
type = "org.wso2.carbon.identity.core.handler.AbstractIdentityHandler"
name = "org.wso2.is.notification.ApimOauthEventInterceptor"
order = 1
[event_listener.properties]
notification_endpoint = "https://localhost:${mgt.transport.https.port}/internal/data/v1/notify"
username = "${admin.username}"
password = "${admin.password}"
'header.X-WSO2-KEY-MANAGER' = "default"Jalankan service dengan mengetik perintah :
<PRODUCT_HOME>/bin/api-manager.bat2. Konfigurasi Instance Gateway GW-1
Berikut ini adalah langkah – langkah untuk mempersiapkan gateway GW-1 :
<PRODUCT_HOME>/bin/profileSetup.bat -Dprofile=gateway-worker[server]
server_role = "gateway-worker"
offset= 1
[super_admin]
username = "admin"
password = "admin"
create_admin_account = true
[user_store]
type = "database_unique_id"
[database.shared_db]
type = "postgre"
url = "jdbc:postgresql://localhost:5432/shared_dbgw"
username = "wso2carbon"
password = "wso2carbon"
driver = "org.postgresql.Driver"
[keystore.tls]
file_name = "wso2carbon.jks"
type = "JKS"
password = "wso2carbon"
alias = "wso2carbon"
key_password = "wso2carbon"
[truststore]
file_name = "client-truststore.jks"
type = "JKS"
password = "wso2carbon"
[apim.key_manager] # ==> Key Manager Configuration arahkan ke Control Plane
service_url = "https://localhost:9443/services/"
username= "$ref{super_admin.username}"
password= "$ref{super_admin.password}"
[apim.jwt]
enable = true
encoding = "base64" # base64,base64url
claim_dialect = "http://wso2.org/claims"
header = "X-JWT-Assertion"
signing_algorithm = "SHA256withRSA"
[apim.cors]
allow_origins = "*"
allow_methods = ["GET","PUT","POST","DELETE","PATCH","OPTIONS"]
allow_headers = ["authorization","Access-Control-Allow-Origin","Content-Type","SOAPAction","apikey","Internal-Key"]
allow_credentials = false
[apim.sync_runtime_artifacts.gateway] # ==> Nama Gateway
gateway_labels =["GW-1"]
[apim.throttling] # Traffic Manager configurations arahkan ke Control Plane
username= "$ref{super_admin.username}"
password= "$ref{super_admin.password}"
service_url = "https://localhost:9443/services/"
throttle_decision_endpoints = ["tcp://localhost:5672"]
enable_unlimited_tier = true
enable_header_based_throttling = false
enable_jwt_claim_based_throttling = false
enable_query_param_based_throttling = false
[[apim.throttling.url_group]] # Traffic Manager configurations arahkan ke Control Plane
traffic_manager_urls=["tcp://localhost:9611"]
traffic_manager_auth_urls=["ssl://localhost:9711"]
[apim.cache.gateway_token]
enable = true
expiry_time = 15
[apim.cache.resource]
enable = true
[apim.cache.jwt_claim]
enable = true
expiry_time = 900
[apim.oauth_config]
remove_outbound_auth_header = true
auth_header = "Authorization"
[apim.cors]
allow_origins = "*"
allow_methods = ["GET","PUT","POST","DELETE","PATCH","OPTIONS"]
allow_headers = ["authorization","Access-Control-Allow-Origin","Content-Type","SOAPAction","apikey","Internal-Key"]
allow_credentials = falseJalankan service dengan mengetik perintah :
<PRODUCT_HOME>/bin/api-manager.bat
3. Konfigurasi Instance Gateway GW-2
Berikut ini adalah langkah – langkah untuk mempersiapkan gateway GW-2:
<PRODUCT_HOME>/bin/profileSetup.bat -Dprofile=gateway-worker[server]
server_role = "gateway-worker"
offset= 2
[super_admin]
username = "admin"
password = "admin"
create_admin_account = true
[user_store]
type = "database_unique_id"
[database.shared_db]
type = "postgre"
url = "jdbc:postgresql://localhost:5432/shared_dbgw"
username = "wso2carbon"
password = "wso2carbon"
driver = "org.postgresql.Driver"
[keystore.tls]
file_name = "wso2carbon.jks"
type = "JKS"
password = "wso2carbon"
alias = "wso2carbon"
key_password = "wso2carbon"
[truststore]
file_name = "client-truststore.jks"
type = "JKS"
password = "wso2carbon"
[apim.key_manager] #==> arahkan ke Control Plane
service_url = "https://localhost:9443/services/"
username= "$ref{super_admin.username}"
password= "$ref{super_admin.password}"
[apim.jwt]
enable = true
encoding = "base64" # base64,base64url
claim_dialect = "http://wso2.org/claims"
header = "X-JWT-Assertion"
signing_algorithm = "SHA256withRSA"
[apim.cors]
allow_origins = "*"
allow_methods = ["GET","PUT","POST","DELETE","PATCH","OPTIONS"]
allow_headers = ["authorization","Access-Control-Allow-Origin","Content-Type","SOAPAction","apikey","Internal-Key"]
allow_credentials = false
[apim.sync_runtime_artifacts.gateway] #==> Ini adalah nama Gateway Alias
gateway_labels =["GW-2"]
[apim.throttling] # ==> Traffic Manager configurations arahkan ke Control Plane
username= "$ref{super_admin.username}"
password= "$ref{super_admin.password}"
service_url = "https://localhost:9443/services/"
throttle_decision_endpoints = ["tcp://localhost:5672"]
enable_unlimited_tier = true
enable_header_based_throttling = false
enable_jwt_claim_based_throttling = false
enable_query_param_based_throttling = false
[[apim.throttling.url_group]] # ==> Traffic Manager configurations arahkan ke Control Plane
traffic_manager_urls=["tcp://localhost:9611"]
traffic_manager_auth_urls=["ssl://localhost:9711"]
[apim.cache.gateway_token]
enable = true
expiry_time = 15
[apim.cache.resource]
enable = true
[apim.cache.jwt_claim]
enable = true
expiry_time = 900
[apim.oauth_config]
remove_outbound_auth_header = true
auth_header = "Authorization"
[apim.cors]
allow_origins = "*"
allow_methods = ["GET","PUT","POST","DELETE","PATCH","OPTIONS"]
allow_headers = ["authorization","Access-Control-Allow-Origin","Content-Type","SOAPAction","apikey","Internal-Key"]
allow_credentials = false<PRODUCT_HOME>/bin/api-manager.bat4. Publish API
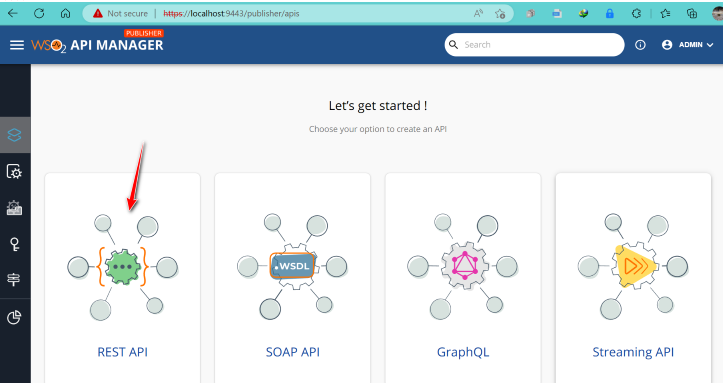
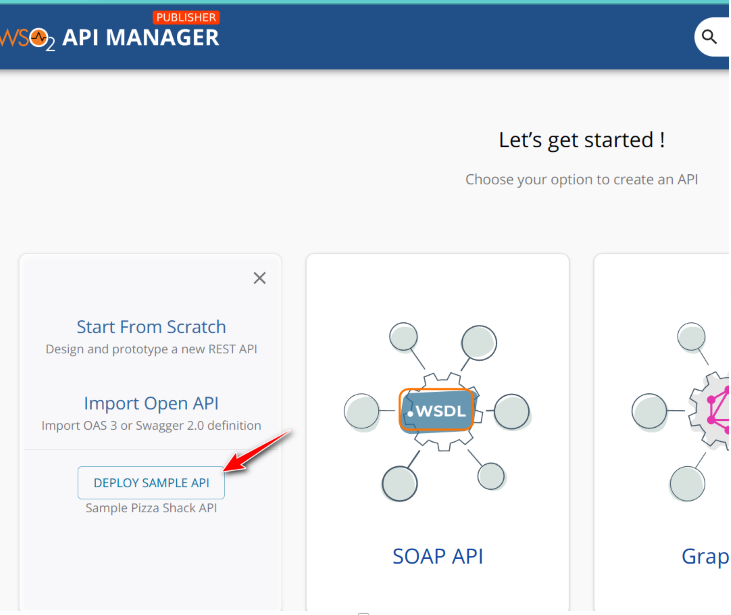 Secara otomatis, API akan ter-deploy ke gateway GW-1
 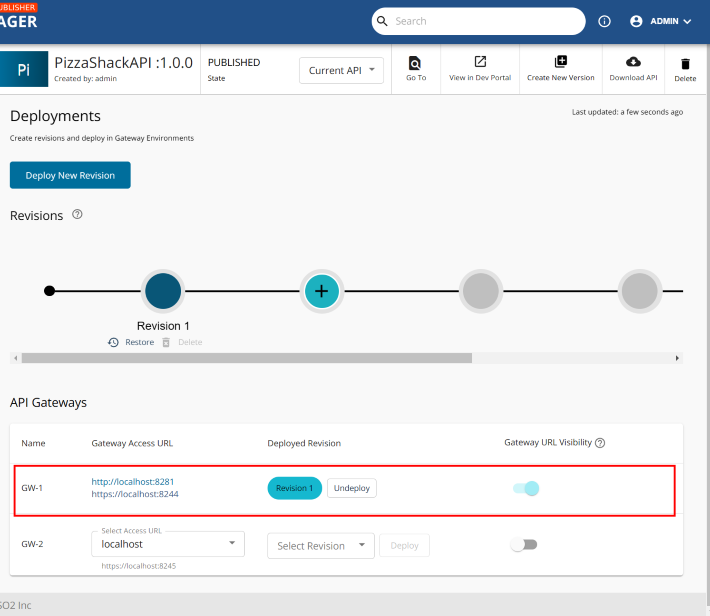 Selesai buat sample API di GW-1
Buat sample API JSON Placeholder dan deploy ke gateway GW-2 :
Selesai buat sample API di GW-1
Buat sample API JSON Placeholder dan deploy ke gateway GW-2 :
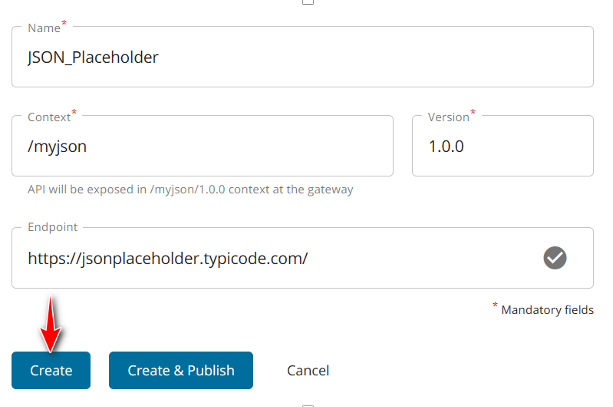 Tambahkan resource melalui menu Develop - API Configurations - Resources, lalu klik tombol "+" dan klik tombol Save
URL Pattern /POSTS Kini saatnya deploy API ke Gateway GW-2 melalui Deploy - Deployments dan pilih GW-2 serta klik tombol Deploy
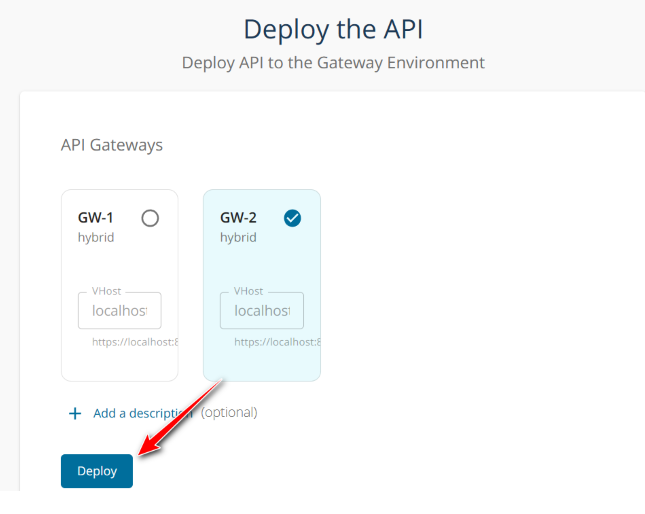
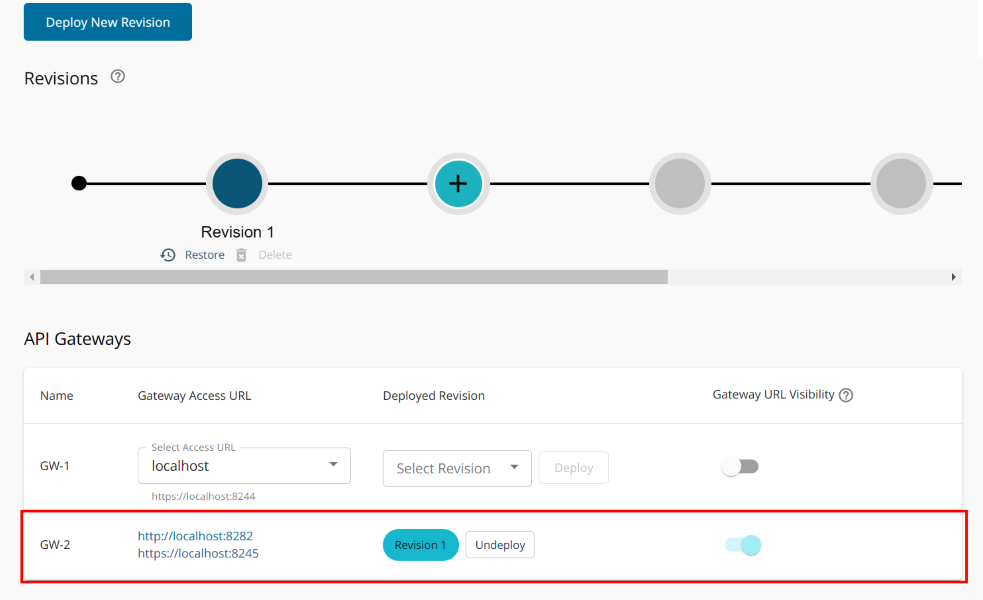 Selesai buat sample di GW-2
Silahan tryout